Scope of Article
This article is intended for J2ME beginners and steps through every process of developing a MIDP compatible MIDlet. It is assumed that the reader has sufficient knowledge of general Java development using J2SE.
Java’s Original Promise
In the beginning Java was intended as a programming language that would power devices ranging from toasters to servers. This did not happen at first, but nearly a decade later Java found its way onto the mobile phones of millions of people and proved for the most part its ability to allow developers to “Write Once Run Anywhere”.
With this solid footing Java continues attempting to make inroads into other problem domains.
About J2ME
Programmers who have worked with J2SE expect that J2ME is its easier, little brother. Nothing could be further from the truth. J2ME development involves overcoming the limitations of mobile devices which do not exist on modern desktop let alone servers. In other words, the types of wastes you could get away with in J2SE will not be tolerated in J2ME and you’ll need to be mindful of every object instantiated and every byte used. Most of this site is dedicated to the topic of overcoming mobile device limitations and you’ll find much of the content useful in your future endeavours. In the end you’ll be able to take what you learn in J2ME and apply it in your J2SE projects to make them faster and leaner.
Getting Started: “Hello World” in J2ME
Whereas you write applications for the desktop and Applets for web browsers you write MIDlets for mobile devices.
Just as J2SE applications have an entry point (any class with a main() method) MIDlets have a class which extends the abstract MIDlet class. This class offers the startApp() method which will serve as the entry point to your MIDlet.
In J2SE, Hello World consists of merely System.out.println()-ing the static String “Hello World”. Unlike J2SE many J2ME devices do not have the concept of an on-screen console and as such we cannot avail ourselves of the System.out.println() method to print “Hello World” for us.
We must instead draw “Hello World” to a graphical canvas which we will then assign to be the currently displayed screen. If you’ve dabbled in AWT or Swing you likely have seen the Graphics object which acts as our paintbrush when painting to the Canvas. For those not familiar, the Graphics object is state-object with a current color, line-thickness, font etc…
Drawing Hello World :: The Rendering Process (in plain English)
Below are the steps required to draw “Hello World” on screen.
1. Set the current color to black
2. Fill the entire screen (using the current color)
3. Set the current color to white
4. Print “Hello World!” (using the current color and font)
So that Hello World’s font’s color is different from that of the screen we explicitly set both prior to filling the screen and printing our text.
The canvas code
Translating the steps above to Java code gives us this…
HelloWorldCanvas.java
import javax.microedition.lcdui.Canvas;
import javax.microedition.lcdui.Graphics;

public class HelloWorldCanvas extends Canvas {

	protected void paint(Graphics g) {

		g.setColor(0, 0, 0);
		g.fillRect(0, 0, getWidth(), getHeight());
		g.setColor(255, 255, 255);
		g.drawString("Hello World!", 20, 20, Graphics.LEFT | Graphics.BOTTOM);
	}
}
Connecting the Canvas to the MIDlet.
Since the entry class of any MIDlet must extend the MIDlet class it cannot extend the Canvas class we just created (no multiple inheritence in Java).
We need a MIDlet implementor class like the one below…
HelloWorld.java
import javax.microedition.lcdui.Display;
import javax.microedition.midlet.MIDlet;
import javax.microedition.midlet.MIDletStateChangeException;

public class HelloWorld extends MIDlet {

	public HelloWorld() {

	}

	protected void destroyApp(boolean conditional)
			throws MIDletStateChangeException {

	}

	protected void pauseApp() {

	}

	public void startApp() throws MIDletStateChangeException {

		Display.getDisplay(this).setCurrent(new HelloWorldCanvas());
	}
}
To recap, our entry class HelloWorld has its start method executed which sets our Canvas class HelloWorldCanvas to the currently displayed canvas (a MIDlet can have more than one Canvas). It then tells the canvas to begin drawing itself.
Fast forward :: The structure of a Completed MIDlet
Besides java files there are a minimum of 3 files required to build a MIDlet.
1. The JAR file
Anyone who has created a WebStart application or a server-side web application in Java will have come into contact with JAR files. They are essentially the same as ZIP archives and in the J2ME world they serve to compress the MIDlet as best as possible. They include the classes that constitute the MIDlet, and any resources such as images and data files used.
2. The JAD file
A JAD file is a lightweight proprties file in the which is offered to the target device prior to commiting to the full JAR download. It informs the device of the size of the MIDlet and any expectations and requirements it has of the device.
As the JAR files size must be mentioned and since it always changes during development it is advised to use JammedUp to automate this process with each build.
HelloWorld.jad
MIDlet-Name: HelloWorld
MIDlet-Version: 1.0
MIDlet-Vendor: VENDOR-NAME-HERE
MIDlet-Jar-URL: HelloWorld.jar
MIDlet-Jar-Size: 1523
MIDlet-1: HelloWorld,,HelloWorld
MicroEdition-Profile: MIDP-2.0
MicroEdition-Configuration: CLDC-1.1
MIDlet-Data-Size: 0
build: 1
Last-Modified: 2007-04-09 08:17:25
3. The Manifest
All MIDP compatible MIDlets must include a MANIFEST.MF file residing in the META-INF directory of the JAR file. This file reasserts some of the basic settings found in the JAD file for validation purposes and is provided in the properties file format.
MANIFEST.MF
MIDlet-Name: HelloWorld
MIDlet-Version: 1.0
MIDlet-Vendor: VENDOR-NAME-HERE
MicroEdition-Profile: MIDP-2.0
MicroEdition-Configuration: CLDC-1.1
MIDlet-1: HelloWorld,,HelloWorld
At this point you don’t need to worry too much about the contents of the JAD and manifest files. I’ll be devoting an article to their maintenance in the near future. For the purposes of this article you need only know that they are essential files for running any MIDlet.
Directory Structure
If you are intending on using the ANT build script I provide below to automate your project’s build then all of these files must appear in a particular hierarchy. Below is an image of that hierarchy. Ensure that the files are placed in the proper directories.
The Directory Structure
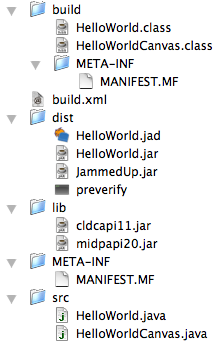
Although I discuss each of build steps in detail below I want to briefly explain the directory structure’s purpose.
The src directory is where the two java files are located.
When compiled the resulting class files will be placed in the build directory along with the MANIFEST.MF file which is copied from the META-INF directory.
The lib directory houses the two main J2ME library JAR files that are needed for our project.
Upon JARring the project, the files located in the build folder will be archived and the resulting JAR files will be placed in the dist folder where the JAD file is normally housed. It is here that preverify and JammedUp process the JAR file and update the JAD file.
This is by no means the only way to layout your project’s files but it’s a basic one that has worked well for me many times.
Rewind :: The Build Process
Compilation
Either performed automatically by an IDE or done by hand or automated via ANT. The end result is a set of class files. In this example there should be two files: HelloWorld.class, and HelloWorldCanvas.class.
JARing
The project classes, the manifest and resource files are bundled into one file: HelloWorld.jar.
Preverification
Unlike J2SE classes J2ME classes must have their contents preverified prior to execution on the device. This is compensation for the limited processing power of mobile devices. This stage includes checks for illegal bytecode or constructs not supported by J2ME.
The preverify tool comes with most emulators and for Mac users the MPowerPlayer offers an OS X compatible binary.
JAD Updating
The JAD file has its contents updated to reflect the properties of the JAR file.
To download JammedUp click here.
(Learn more about JammedUp…)
Automating the build process with ANT
ANT can be used to perform all of the build steps in sequence saving you much time and effort. The source code download also includes a sample ANT build script.
build.xml
<project name="helloworld" default="dist" basedir="." >
	<property name="app.name" value="helloworld" />
	<property name="app.path" value="/${app.name}"  />
	<property name="build.home" value="${basedir}/build" />
	<property name="lib.home" value="${basedir}/lib" />
	<property name="dist.home" value="${basedir}/dist" />
	<property name="src.home" value="${basedir}/src" />
	<property name="compile.debug" value="true" />
	<property name="compile.deprecation" value="false" />
	<property name="compile.optimize" value="true" />

	<target name="all" depends="dist" description="Clean build and dist directories, then compile" />

	<target name="clean" description="Delete old build directory">
		<delete dir="${build.home}" />
	</target>

	<target name="compile" description="Compile Java sources">
		<javac srcdir="${src.home}" destdir="${build.home}" debug="${compile.debug}" deprecation="${compile.deprecation}" optimize="${compile.optimize}">
			<classpath>
				<fileset dir="${lib.home}" includes="*.jar,*.zip" />
			</classpath>
			<include name="**/*.java"/>
		</javac>
	</target>

	<target name="bundle" depends="compile" description="Takes the built objects and makes a JAR file.">
		<mkdir dir="${build.home}/META-INF"/>
		<copy todir="${build.home}/META-INF">
			<fileset dir="META-INF" includes="**/*.MF" />
		</copy>
		<jar jarfile="${dist.home}/HelloWorld.jar" basedir="${build.home}" includes="**/*.class" />
	</target>

	<target	name="preverify" depends="bundle" description="Preverifies the JAR file.">
		<exec dir="${dist.home}" executable="<path-to-project>/dist/preverify">
			<arg line="-d ${dist.home} -classpath ${lib.home}/cldcapi11.jar:${lib.home}/midpapi20.jar ${dist.home}/HelloWorld.jar"/>
		</exec>
	</target>

	<target
		name="dist"
		depends="preverify"
		description="Create binary distribution">

		<exec dir="${dist.home}" executable="java">
			<arg line="-cp %CLASSPATH%;.;.. -jar JammedUp.jar HelloWorld.jad -b -d -s"/>
		</exec>

	</target>

</project>
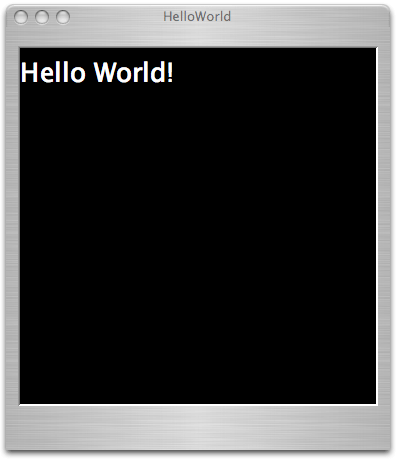
Running HelloWorld
If the build worked perfectly you now have a HelloWorld.jar and a HelloWorld.jad file pair in your dist directory. Using your emulator, instruct it to open the JAD file and you should see something similar to the below image…
Image of Hello World running in MPowerPlayer
In Closing
In this article you learned how to develop, deploy and test your first MIDlet. But this is just the beginning of your journey to become a great J2ME developer. This site continues to grow and provide tips and techniques for both beginners and experts alike and I also recommend the J2MEForums for finding quick answers from programmers of all calibres.

 Thank you for visiting this blog site. I have moved over to iPhone development recently and have finally released my first iPhone app, KEYBOX! KEYBOX was originally a J2ME app for Vodafone Japan’s feature phones. The new iPhone version uses the full power of the iOS platform to fully secure your private life.

You must be logged in to post a comment.